Showing posts with label crafts. Show all posts

Saturday, December 3, 2011

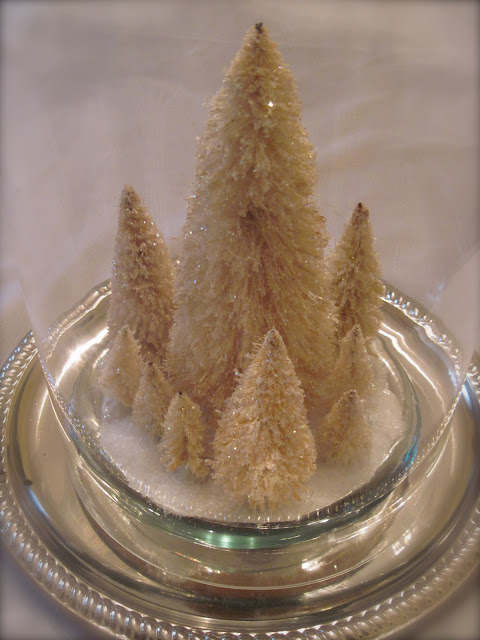
New Vintage Bottlebrush Trees

I love those vintage bottle-brush trees in white and pastels. They're classic, nostalgic Christmas goodness. They're also hard to find, and even harder to afford in a quantity you can do something with.


Which is why I was thrilled to find on Pinterest some magic performed by The Crafty Minx. She took the readily available and far cheaper green, flocked trees and bleached them! I loved that they weren't the stark white that most new ones are, sporting a creamy vintage look instead.

I found a big bag of trees in assorted sizes (about a dozen and a half) at the Home Depot for $7 and determined to try this myself.

I won't reinvent her tutorial. But I will share how I deviated:
1) I didn't use gloves. I wish I had. But if you want a chemical peel on your hands, skip the gloves and you'll experience pretty much the same thing.
2) I just used a big glass bowl instead of a plastic tub, since I had a bowl and not a tub, and did them a few at a time.
3) I found both mildly diluted bleach and straight bleach worked fine and took about the same amount of time.
4) I didn't scrub and I didn't soap/water wash. I just soaked and then rinsed thoroughly. I scrubbed and soaped the first one and thought it too abusive. Because I didn't beat the bejeebers out of them, some of the flocking did remain, and I liked that look, too.
5) It took a lot longer than the five minutes she cited to achieve the right color.  More like 20 minutes. But I used house-brand bleach, so maybe the "good stuff" would act faster.
6) I opted to glitter and not dye (see Crafy Minx's tutorial if you want to dye). I think it'd be worth trying to leave them white with colored glitter, too. But for this batch, I used a white-ish iridescent glitter.


To "glitterfy" your dried trees:
1) Set your sound system to play Christmas music. Is there anything better than Michael BublĂ© and glitter? Thought not.
2) Cover your work surface. Consider donning an apron to protect yourself from glue spatter.
3) Gather materials:
  • Adhesive. A white, clear-drying glue like Elmers or ModPodge. I had ModPodge on hand, so that's what I used. Pour some in a small bowl or measuring cup and thin with a little water. You want to prevent crushing the fine fibers with thick glue. Alternately, you probably could use a spray adhesive; just make sure you have good ventilation, protect surfaces and tree base from over-spray, and tape your base to a surface to prevent the propellant from blowing these lightweight trees over.
  • A paintbrush. I used an old paintbrush I had laying around from a recent paint project. A medium artist brush would probably work fine; the little ones like those that come with your kids' watercolors is probably too small.
  • A bowl for excess glitter.
  • Glitter. I got my iridescent glitter at Hobby Lobby a few years ago.


4) Dip your brush into the thinned glue and dab onto your tree, using a stippling action at a slight angle, from bottom to tip.


5) Clean ModPodge off your camera. *sigh*
6) Once you have the glue all over the tree, hold the tree over your bowl and sprinkle with glitter.

I have a whole new appreciation for photo tutorials.
Do you know how hard it is to craft with one hand and photograph with the other?
7) Shake off excess and set tree aside to dry.
8) When done, make sure you clean your brush, glue bowl and anything else with the glue on it right away. ModPodge is used to seal and adhere materials to surfaces permanently; you don't want that hanging out in your brush.

Let your trees dry - done!

Epsom salt, by the way, makes perfect snow. And post-holiday, you can soak in it and relieve all that holiday stress.


Monday, July 11, 2011

Fun with Shrinky Dinks

Remember Shrinky Dinks?  I do.  I remember having great ideas of what they would become and then pulling them out of the oven to see them cool to a bubbled-up, warped mess.

But when I saw what Cathe Holden was able to do with a new breed of Shrinky Dinks you can use in your printer, I had to give it another go.

I had the idea to do something with my kids' pictures when I discovered a method to digitally edit your pictures to make silhouettes.  I decided to do a twist on classic cameos and silhouettes, making unique "mom" jewelry that was more my speed than the little stick figures with jeweled bellies or metal-stamped disks one so frequently sees.

I began by having my kids stand one at a time sideways against a blank wall while I took their picture.

Not having Photoshop, I inserted their pictures into Microsoft Word, cropped/shaped them to ovals, and fiddled with the brightness/contrast settings until I had silhouettes.  To shape them up a bit, I did have to draw freestyle shapes to cover where I didn't want a collar sticking out or to cover places that still insisted on being a color, etc.  (If you do this project, I suggest your subjects wear collarless, solid shirts.)  If you are using a detailed image, you'll need to fade the picture before printing, as the colors will intensify as they shrink.  I used pale gray dotted lines to show me where to cut; if you have a punch the correct size, you can omit this part.

I then designed smaller circles with their names and dates of birth on the same page, and printed the whole thing out onto the Shrinky Dinks for inkjet printers (white sheets).  I followed the directions and set my printer for transparencies and less ink.  My printer was still smudging some and I suspect this is largely due to the medium and not the printer, so I suggest designing your page with multiple copies of each charm image so you can use the ones that come out best.  A clean white eraser, lightly applied, did help some. 

The silhouettes were sized at 2.1" tall by 1.75" wide for a finished size of about .76" tall and .74" wide.  The smaller circles were 1.5" diameter and baked to about .6" wide and .5" tall.  Oddly, the ovals ended up more circular and the circles ended up oval.  Shrinky Dinks are not an exact science, so expect some variation.  Again, preparing duplicates will give you the option to use those most  uniform.

I then cut the images out and punched them with an eighth-inch punch so I could insert jewelry links later to make them into charms.

As instructed, I preheated my oven to 275 and used an oven thermometer to make sure it was at temp when I put them in - and that it stayed at temp.  I put the charms on a single layer of brown grocery sack lining a cookie sheet per instructions and popped them in. 


I checked them frequently, panicking when I saw them becoming teeny tiny bowls.  But the instructions said to wait until they went flat again, so I chewed my nails and waited.  Sure enough, they got flat!  Thirty seconds later, it was time to take them out, and I immediately slid the grocery sack sheet w/ the hot charms onto a cool surface, pressing them gently with some clean paper and a book for a minute.  The baking process took about 5-7 minutes.


Once cooled, I sealed them with a little clear spray enamel and let them dry.  Put a loop of tape on the back of the charm and attach them to the grocery sack sheet to keep them from being blown about by the force of the spray; tape down the paper, too, so it doesn't flip up or go flying.  You can reportedly use clear topcoat nail polish as well, but I didn't want streaks or long-term yellowing.  I played with coloring the sides and backs with silver marker/nail polish, but decided I liked it plain better; it looked more like porcelain charms. 


I had some faceted crystal beads left over from making Christmas stockings several years ago, and a strand of vintage pearls from a necklace restoration.  I made additional charms with these on jewelry pins, to insert between the Shrinky Dink charms for a little sparkle and sheen.  I put the beads on the pin, used needle-nose pliers to turn a loop and cut off the excess.

I couldn't find a basic link bracelet because I was finally looking to buy one.  Before, I saw them all the time, so I figured this would be the easy part.  Why does it always work that way?  I ended up getting a clearance "fashion" necklace from the teen jewelry and cutting off a piece, which gave me the necessary clasp as well, in addition to a sparkly pendant for my girls to fight over (yay).  You can purchase the chain and the clasps at your craft store and put it all together, but using the necklace was half the price and a quarter of the work.

I put links on the charms and added them to the bracelet, spacing them the best I could.  Next time, I'll start with the bracelet and decide how many charms I need.  I'll probably make a few more for this one and fix the spacing eventually.  Or not.

I ended up with this:


I'm very happy with it, and my kids, especially my little guy, love seeing themselves on my wrist.  And now I don't feel like a complete failure as a mom who never has pictures in her purse.

Saturday, July 2, 2011

Chair makeover

Several years ago, when I started freelancing from home, my father-in-law, knowing I needed a better desk chair, picked one up for me from a sale our local school district was having to get rid of surplus office furniture.  It was a well-made Steelcase chair still in great shape, cheap, and though the color wasn't the best, it would certainly do.

Fast forward eight years, two more kids (who can't avoid using my chair, it seems), and lots of abuse later, and it was a sorry mess.  Still in great shape structurally, but stained and the blue was, well, not "doing" anymore.  I tried slipcovering, but it always bunched, shifted and came off.  Time to devise plan B.


Having seen some tutorials on how to recover similar chairs, I finally knew how to get around that plastic "piping" and other troublesome spots that I thought would prohibit me from making this a manageable DIY project.

The fabric store down the street has a fantastic remnant/clearance room with lots of upholstery-grade fabrics.  What I walked away with was $3/yard, 54" wide, unbleached cotton duck and an idea of something like the French-printed burlap furniture and accessories trend.  Surely the duck would be a better choice than burlap for something one was actually going to sit on daily, and often in shorts.

Draping the fabric on the chair, I figured out how wide and deep each piece had to be and cut them out as rectangles as opposed to matching the seat/back shapes.  I'd be stapling these underneath and could cut off the excess after, so following the shape wasn't important. 

I found a graphic I liked on Graphics Fairy's blog.  Fantastically, she'd already made it available the right size and in reverse, saving me the effort of doing it in photo editing software.

I used HP's inkjet transfer paper purchased some time ago for another project, positioned it on the piece for the back, forgetting to cut off the excess transfer.  Using a hot iron and lots of pressure, I slowly applied the transfer.  After it cooled a bit, I removed the paper and found it wasn't applied quite as well as it could be, so I laid the paper back down and continued to press.  And I repeated this for what seemed like forever in an effort to lessen the floating, rubbery effect of the transfer paper.  I finally reached a point where I decided it wasn't going to get better and it would certainly do; let's move on.

I then centered the fabric on the back piece, flipped the chair over with the back on the floor so I could apply pressure with my staple gun, initially stapling top/bottom and sides enough to hold the fabric in place and taut while I worked on the rest.  I just covered over what was already there instead of deconstructing things further.  Then I stapled around the perimeter and trimmed the excess fabric.  Popped the back plate on again in reverse process of how I took it off.

Inside, I found the names of those who originally upholstered
it at Steelcase.  It took three people to do it,
but only one to redo it.

Then I tackled the seat the same way.  Sprayed it all with some Scotchguard for some safeguarding against those kids.  Voila!  Done.


I was rather disappointed in the "wet" look where the excess transfer paper was.  Although I goofed in not trimming closer to the graphic (they recommend leaving a quarter-inch around the graphic), I would not have been able to remove all the excess and I still would have the discoloration wherever the excess was still intact.  It may look less odd/messy as a rectangle; I don't know.  I do know I'd prefer not to have the slightly "wet" coloring of the fabric.

I'll be testing the Citrasolv/Orange Glo/paint thinner method before tackling the next one, I think, to see if that comes out with a better "printed" look and less "transfer" look.  I'll let you know!

Total project was less than $5.  Woot!


Friday, June 17, 2011

Being Crafty

Anyone with kids knows how hard it can be those first few weeks of summer vacation, when the constant pace and activity of school suddenly stops, and the kids are having to find their own means of killing time.  What they often resort to tends to kill mom while killing time, and we can't keep going "somewhere" everyday.

Enter my crafty plan.  I get a break from the constant bickering they usually call entertainment and hopefully, something pretty or practical out it.  They think it's all about them.  See?  Crafty.

Our first craft seemed simple enough.  Inspired by a picture on Pinterest of these hollow yarn balls, I wondered if it could be done in a more beach cottagy jute.  Got some basic jute twine, a bottle of Elmer's glue and a package of balloons - let's try it.  They struggled a bit more than I thought, but in the end, they turned out pretty nice.

TWINE BALLS

Step 1:  Blow up balloons to a variety of sizes, 2-5" diameter.
Step 2:  Mix Elmer's glue about 60/40 (glue/water) in a bowl.  You can reportedly use fabric stiffener instead, in which case, skip the water.
Step 3:  Cut off a loooong piece of jute (or yarn, if that's what you are using).
Step 4:  Put the length of jute in the glue mixture; keep track of one end.  I used a fork to mash it down into the glue and the glue into it.  Get it good and saturated.
Step 5:  Start pulling the jute out from the glue, running your thumb and forefinger down the string as you remove it to squeeze out the excess glue.  Loosely wrap around your hand as you go; keeps it from being tangled when you get to the next step.
Step 6:  Wrap the string around the balloon in all directions, randomly.  You want holes, but not really big ones, so look for inconsistent gaps in coverage.  If you run out of string before you are done, just start another piece.  If you mess up, unwrap and try again.  They are very forgiving.  Tuck the end.
Step 7:  Set to dry on wax paper or plastic wrap at least overnight; rotate to make sure all sides get dry.   Yes, they smell like the mustiest cabin you ever camped in as a kid, but don't worry, they'll be fine once dry.
Step 8:  Once they are dry, pop the balloon and pull the pieces out with a tweezer.
Step 9:  Enjoy!  Piled in a large vase, basket or bowl, they add great texture and your kids can brag that they made them.

Now, to keep them away from the cat...